Year In Temperatures Scarf

Craft

I’m not sure you all are interested in my knitting projects, but I thought I would post the finish of a year long project: my Year In Temperatures scarf. I finished it on New Years Eve and wove in a billion ends on New Years day and wore it to work yesterday. It’s very rustic looking and maybe not the prettiest thing but I like it. I think if I were to do another one (and I might in a year or two) I would choose the same colors that the Nation Weather Services uses on their maps. For my scarf, I used colors that I had in my stash. Each 5 temperature range had a color assigned to it, starting with purples and blues at the cold end, and reds and pinks at the hot end.

A year in temperatures

Craft

Inspired by my IG buddy, Heather,  I decided to start on a Year In Temperatures scarf sometime around mid May. I have been knitting a row for each day of the year, the color of the row determined by the temperature of that day. I have assigned a color for each range of 5 degrees, starting with cooler colors in the zero to teens, up to reds, oranges, and warmer colors in the higher end of the scale.

Today I reached a dilemma. I recorded yesterday’s temperature and realized I had not chosen a color for the temperature it was yesterday. I guess when I was picking colors I thought, “oh it doesn’t get that hot here.” Guess what! it got that hot here! It was 104 degrees yesterday. Today it was predicted to be 107, though according to my Apple Watch, it hasn’t hit 100 yet today.

I needed a color for 101 – 105 and a color for 106 – 110 (Good lord. Baby Jeebus help us if it ever gets up to 110 here). So, any excuse to buy yarn, even on a 7th ring of hell hot day like today, I bought a rusty brown for 101 – 105, and a warm brown for 106 – 110. I figure if it gets above 105 everything will be dead and brown, so.

Here is what I have so far for each month.

Welcome to my new crafty obsession 

Craft

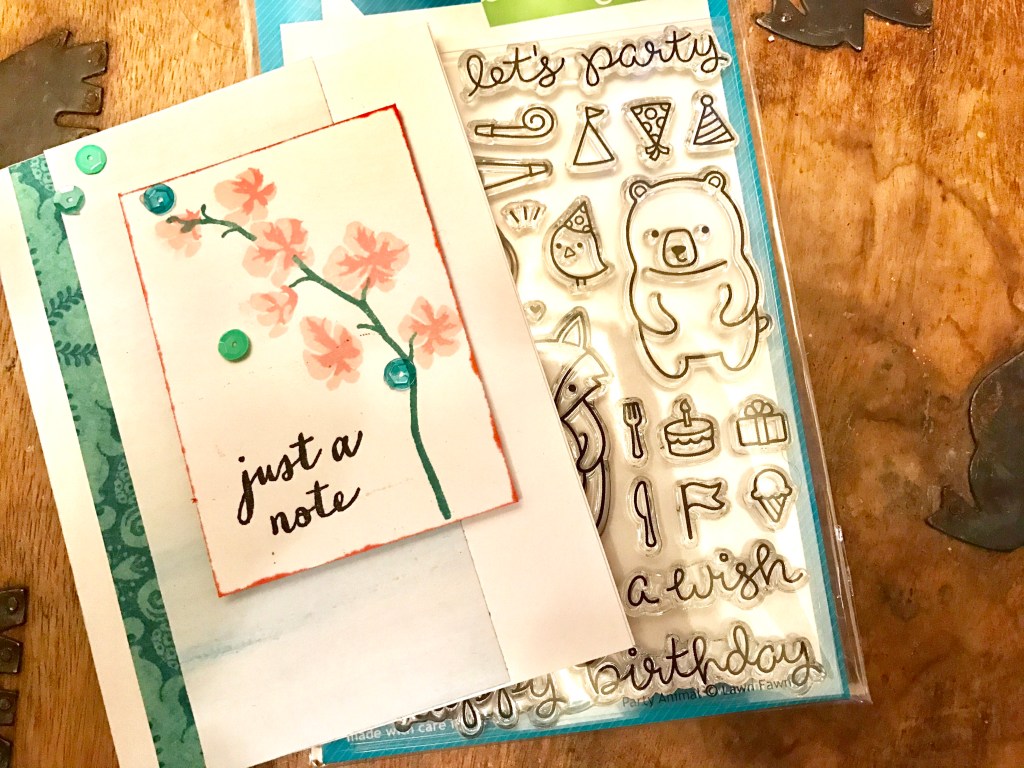
I’ve always had a fascination with paper crafts but have never delved very far into that world. When scrapbooking was popular I was, for some reason, repelled by it but also had a strange fascination. This interest ebbs and flows. 

Recently I was in a local craft store buying art supplies and found myself drawn to an aisle that carried all of these completely adorable stamps and examples of handmade cards. I was instantly hooked. I started collecting these things and have even tried making a few, but I honestly don’t know what I’m doing.

Today I was at Craft Warehouse again and they offered a free class! So I made this card. It was fun. 🙂

Pussy hats galore

Craft, Life

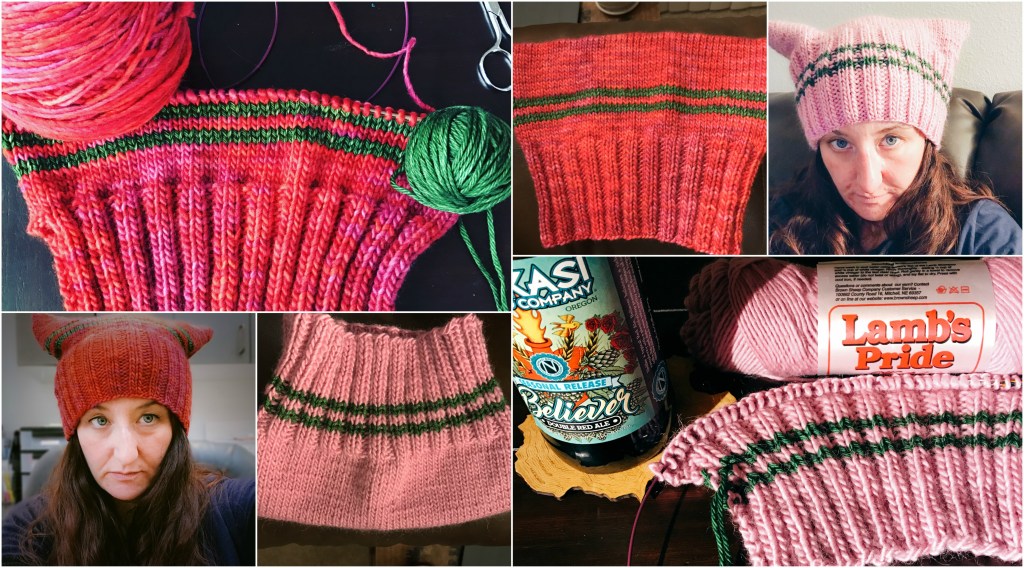
In my post about the Women’s March I talked a little bit about the lead up to the march and my indifference. At the time, I didn’t see the point of protesting. I didn’t see how it could accomplish anything. As I pondered these thoughts I kept seeing these hats pop up on my IG feed and, occasionally, around town. I had to admit, I was curious. But I couldn’t drum up enough interest to knit one.

Then I read an article, written by a woman, who was irritated by the pussy hat. I can’t find the article right now (dammit) but I remember her mentioning that the hat would be made fun of, that the march was a serious matter and the hat would distill the march into something silly. She used “bra burning” as an example from the past.

I saw many of my knitter friends get angry at this article and, indeed, I felt annoyed by it as well. I am generally annoyed by people who tell me, or others, how I should think or what I should do, or that my actions aren’t good enough. And when women put down other women I feel a deep annoyance that is hard for me to articulate. Her argument was in the back of my mind in the lead up to the march. In the mean time I felt a tinge of inspiration and empowerment with each pussy hat I saw finished by my friends on Instagram. Still, I didn’t make one. Mostly because I didn’t expect to go to a march.

But the tides turned and I did go to a march! As I walked to the meetup spot I was nervous about who would show up. I was nervous that I would be alone in a crowd of people I didn’t know. However, that fear quickly dissipated as I got closer. I smiled as I saw all of the women walking down the street wearing Pussy Hats. I thought, “These are my people!”  And then to see a crowd of people with pink hats at the meeting spot filled my heart with joy. I could see the purpose of the hat very clearly. It was a way to unify all of. A rallying point. Later on in the day when I saw the photos of the massive crowds and the sea of pink the power of the hat really took on a whole other meaning. It was an incredible sight.

I had to laugh when I saw tweets from Trump supporters wondering who manufactured all of these hats and how did the do it so quickly! LOL! Never underestimate the power of knitters. Or of women.

I went to a meetup of the women I marched with here on Sunday. It was the first of many meetings. We are coming together to empower each other and help each other continue to fight and resist. I’m really excited to dig in and be a part of something important.

Oh! And I knitted a Pussy Hat.

Blue (a cyanotype tutorial from a cyanotype newbie)

Craft, Photography

BlueI spent some time last Monday doing more cyanotypes. I made them 4×6 so I could use them as postcards for the postcard swap.

I am really enjoying this printing process. I am learning all kinds of things about printing in general, and specifically contact printing (which I am finding myself interested in).

In case anyone is interested in how this is done, here is how I made this particular print:

1. Find a photo that you think might make a good print. I am still trying to figure what kinds of photos make good cyanotype prints. I have read a few things about this but I learn best via trial and error. Her is the original shot I used. I took it last year in Vacouver B.C. at the farmer’s market on Granville Island.

Sunflowers

2. Invert your photo in your favorite image editing software. The idea is to make your photo into a large negative, as cyanotype is a contact printing process. I use Adobe Lightroom so for me to invert my image I had to adjust the tone curve (using the instructions here).  I created a develop preset for this function.

3. Make your digital negative printable. This, oddly, was the hardest part of this whole process for me at first. Then I discovered Lightroom has a printing module . It makes this part really easy.  I save my file as a PDF.

4. Print digital negative onto transparency paper. You can buy  transparency paper at office supply stores or at Amazon.

5. Mix chemistry. I use the Photographer’s Formulary liquid kit. Mix even amounts of A and B. You will not need very much of each. A small cup used for cough syrup works well to measure out your chemistry. I mix it into a small glass jar recycled from the bin. Once the chemistry is mixed it is photo sensitive so you must mix it in a darkened room. I have a safelight, so I keep that on so I can see. I don’t think the room has to be pitch black dark. I’ve done this in the bathroom with the lights off and light streaming in from under the door and everything turned out fine.

6. Apply chemistry to watercolor paper. This is the part I am still struggling with, so I am not sure I can give much instruction here.  At the moment I am using an art sponge brush and it seems to work OK. I brush it on in horizontal strokes, and then go over it again using vertical strokes. The idea is to get it on evenly and just the right amount.  After you have applied the chemistry let it dry in the dark.

7.  Place your transparency negative on the paper and put a piece of glass on top (sandwich the transparency between the paper and the glass). You want the transparency as flat as possible  on the paper.

8. Place your paper/transparency/glass sandwich in the sun. When your image turns army green it is done.

9. Rinse in running water for 5 minutes. You will watch it develop before your eyes like magic.

10. Place in a hydrogen peroxide/water bath of  for a second to bring out the deep blue color. 50 ML of hydrogen peroxide to 500 ML of water.

11. Let dry.

If I can do this anyone can! It’s fun and easy and a great way to learn about making prints. It would probably be a great thing to do with kids.